How to turn a Pocket CHIP into your home's music server / Chromecast Audio
Do you have, or want, a Pocket Chip? Do you have a Chromecast Audio for each of the speaker setups in your house? If you answered “yes” to the first question and “no” to the second, then this tutorial is for you! 📻
I also answered “yes” to the first question and “no” to the second. And I wanted a way to stream any music I can play on my phone, to my home speakers. I have a Marshall Stanmore speaker that has Bluetooth built in, but Bluetooth sucks: pairing can be a pain, especially if you want to switch which device is controlling the music (like when you have guests over). Also, Bluetooth reception can be shoddy - I can’t bring my phone with me to my bedroom and expect uninterrupted audio in my living room. This is a major downer when I have people over – my phone has to stay in the living room, so I end up just plugging it in Auxiliary Input. But ever since I setup Mopidy + GMusic + web extensions on my Pocket CHIP, those days are over.

If you would like to do this yourself, and you are a Spotify subscriber, I recommend checking out this post by one of the CHIP developers, pnyboer, which shows you how to configure Mopidy for Spotify use. I would add some caveats to his post: Don’t bother changing the [mpd] section of your mopidy config file. If you don’t know what an mpd is, you won’t need to configure it to get your Pocket Chip functioning as a music server for your domain, so don’t worry about it if you don’t care to. I also don’t recommend using MPoD, or any MPD interface from your phone, since it will be a pain for guests in your apartment to have to download an app to be able to control the music.
For non-Spotify subscribers, like me (I use Google Music), here is a full tutorial. Full disclosure: I’m copying some sections of pynboer’s comment so you don’t have to jump between parts of his tutorial and mine.
Install and Configure Mopidy
You’ll need to add a repository to your apt-get sources, then install mopidy. FYI, the default password for the Pocket CHIP is chip.
wget -q -O - https://apt.mopidy.com/mopidy.gpg | sudo apt-key add -
sudo wget -q -O /etc/apt/sources.list.d/mopidy.list https://apt.mopidy.com/jessie.list
sudo apt-get update
sudo apt-get install mopidy
Now launch mopidy for the sole purpose of installing some default configuration files:
mopidy
and ctl-c to quit it once it has finished booting.
At the time of writing, Mopidy is version 2.0.1. Check your version with:
mopidy --version
If it’s not the newest version, you should fix the local scan script:
sudo apt-get update && sudo apt-get install -y wget
cp  /usr/lib/python2.7/dist-packages/mopidy/audio/scan.py scan.py.bak
wget https://raw.githubusercontent.com/SeeSpotRun/mopidy/fix/gstreamer_not_pushing_tags_2/mopidy/audio/scan.py
sudo cp scan.py /usr/lib/python2.7/dist-packages/mopidy/audio/scan.py
You will need to install python development tools so you can use [pip] to install some extensions:
sudo apt-get install python-setuptools python-dev build-essential
sudo easy_install pip
Install a back end extension for your music service
Here are the backend extensions that work with Mopidy. If you are a Google Music subscriber, you are in luck. The GMusic extension is actually much better than the Spotify one, since it adds your saved library to Mopidy, in addition to allowing you to stream the entire contents of the service. However, this tutorial will work for any of the backend music services that have been developed for mopidy. Make sure to follow the instructions on the backend service’s github page. For example, for GMusic, I simply had to pip install mopidy-gmusic
Now, modify the config file:
You can navigate to the config file using the CHIP’s built in file browser, or you can type:
nano ~/.config/mopidy/mopidy.conf
You will need to add the information needed for your backend service. Each backend service’s github ReadMe contains the information you will need.
Install a web interface
You will also be installing a web interface, so you will need to change the [http] section of the config file as well:
[http]
#enabled = true
hostname = ::
#port = 6680
#static_dir =
#zeroconf = Mopidy HTTP server on $hostname
The hostname is the only part you will need to change from the default. Be sure to remove the # at the beginning of the line, since it is commenting out the line to use the default. You can find more information in the mopidy docs.
Now, to make sure the configs are loaded into Mopidy (and if you have any local music you want added), run:
mopidy local scan
before you start mopidy on CHIP with:
mopidy
If mopidy runs without errors, then close it (with ctrl-c), and let’s install a web interface, so you can control the music from any other decive on your network! Here are the available web extensions. I recommend installing Mopidy-Mobile and Mopidy-Moped. You can test them out to see which one works better for you (and your guests). I use Mopidy-Mobile on my phone and Mopidy-Moped on my laptop.
sudo pip install Mopidy-Mobile
sudo pip install Mopidy-Moped

Try it out!
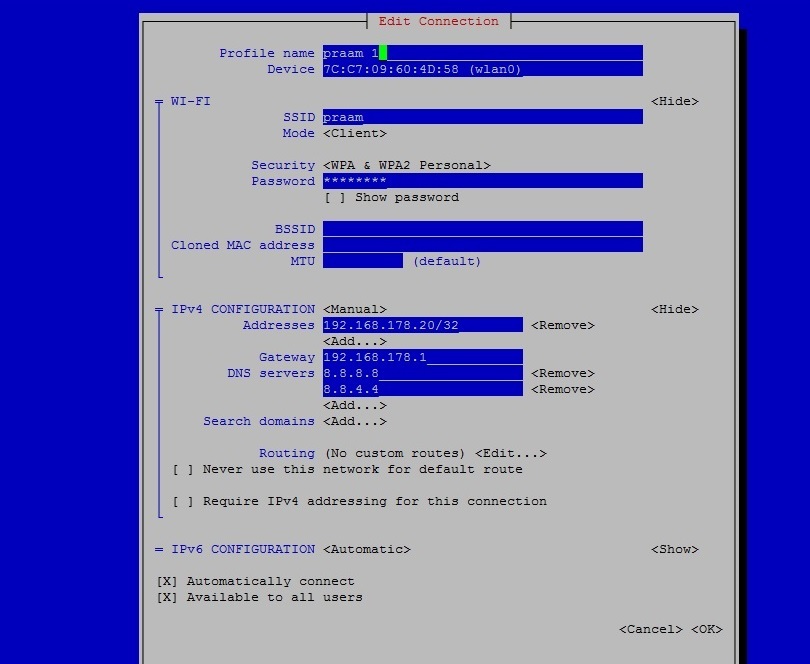
Now you can use a browser to get at http://chip.local:6680/1 to access the web client. You may need to get the IP address from your Pocket CHIP if “chip.local” isn’t working. You can do that in a terminal on the Pocket CHIP with the command ip a and find the address for wlan0. It’s a good idea to set a static IP, so you don’t have to update your bookmark if the IP address changes: nmtui is a great tool for this. Here is a sample configuration posted on the CHIP forums that worked for me:
I hope you find this setup as enjoyable as I do, and give all your roommates and visitors the URL to control your home’s music selection.
What if I just want to stream internet radio from my Pocket CHIP?
Try out this simple command line interface for internet radio: https://github.com/coderholic/pyradio
You might notice that the volume defaults to 100% every time you change a station…
Don’t worry. You can edit the underlying mplayer’s config file (the underlying audio player for pyradio) so that it defaults to 50% (or whatever you choose) instead. "echo 'volume=50' >> ~/.mplayer/config"